How to Add Weighted Bands to Workouts: A Complete Guide

Table of Contents
- Why Add Weighted Bands to Your Training
- Benefits of Adding Bands to Barbell Exercises
- Choosing the Right Resistance Bands for Your Goals
- Step-by-Step: How to Attach Bands to Barbells and Equipment
- Resistance Band Workouts for Beginners
- Progressive Overload Techniques with Weighted Bands
- Safety, Anchoring, and Common Mistakes
- Conclusion
Last Updated: August 10, 2026
Why Add Weighted Bands to Your Training
Adding weighted bands to your workouts transforms how your muscles respond to resistance. Unlike static weight, bands create variable resistance that challenges your body differently throughout each movement. When you load a barbell with 200 pounds, that weight stays constant. A resistance band, however, becomes progressively harder to stretch as you move through the range of motion. At the bottom of a squat, the band provides minimal tension. By the top, when your muscles are strongest, the band delivers maximum resistance. This tension profile matches your body's natural strength curve.
Consistent use of variable resistance forces your stabilizer muscles to work harder, driving both strength gains and muscle hypertrophy when programmed correctly.
Benefits of Adding Bands to Barbell Exercises
Combining bands with barbells creates a training stimulus that neither tool delivers alone. The barbell provides foundational load while the band adds escalating resistance through the strongest part of your lift. A 225-pound squat becomes effectively heavier at the top of the movement, forcing greater muscle recruitment precisely when your quadriceps, glutes, and stabilizers are positioned to handle maximum load.
The eccentric phase benefits similarly. As you lower the weight, band tension decreases, allowing you to control the descent more easily without overwhelming your joints. Your muscles still work hard eccentrically, but the load distribution feels more forgiving.
Compound movements see the most dramatic improvements. Bench press, squat, and deadlift all benefit from banded variations. The band stacking effect, where multiple bands add resistance, lets you customize the tension profile for your specific goals. Many lifters report that banded barbell work improves their lockout strength in competition lifts, with peak tension at the top translating directly to heavier single-rep maxes.
Choosing the Right Resistance Bands for Your Goals
Not all resistance bands perform equally. Band quality, thickness, and material composition determine how they'll function in your training.
Understanding Band Tension and Resistance Profiles
A resistance band's tension profile describes how much force it exerts throughout the stretch. Light bands provide 5-15 pounds of resistance at moderate stretch, while heavy bands deliver 50-100 pounds or more. Some bands have a linear tension profile that increases proportionally as you stretch them. Others have a progressive profile where resistance accelerates dramatically near maximum stretch, matching perfectly with the strongest part of your lift.
Material quality affects durability and consistency. Natural rubber bands maintain their elasticity longer than synthetic alternatives and provide more predictable tension profiles across hundreds of training sessions. Health and Fitness Company provides detailed resistance profiles for their weighted bands so you know exactly what you're getting before attachment.
Assessing Your Current Strength Level
Your current strength determines which band thickness makes sense for your training. Beginners benefit from lighter bands providing 10-25 pounds of additional resistance. Intermediate lifters typically work with medium bands delivering 30-60 pounds. Advanced lifters often use heavy bands providing 70-100+ pounds.
Start conservatively. A common mistake is selecting bands that are too heavy for your current strength level. If you're squatting 185 pounds and adding a band that provides 50 pounds of tension at lockout, you're effectively handling 235 pounds at the top. Test bands before committing to them by performing 3-5 reps with the band attached to your barbell and assessing how it feels through your range of motion.
Step-by-Step: How to Attach Bands to Barbells and Equipment
Proper attachment is non-negotiable. Incorrect setup creates safety hazards and inconsistent resistance that undermines your training.
Securing Bands to Barbell Collars
The most common attachment method uses the barbell collar as an anchor point. Place one end of the band loop around the barbell collar on one side. The band should sit snugly against the collar, not twisted or bunched. Tighten the barbell collar firmly over the band loop with enough force that it won't slip during your set.
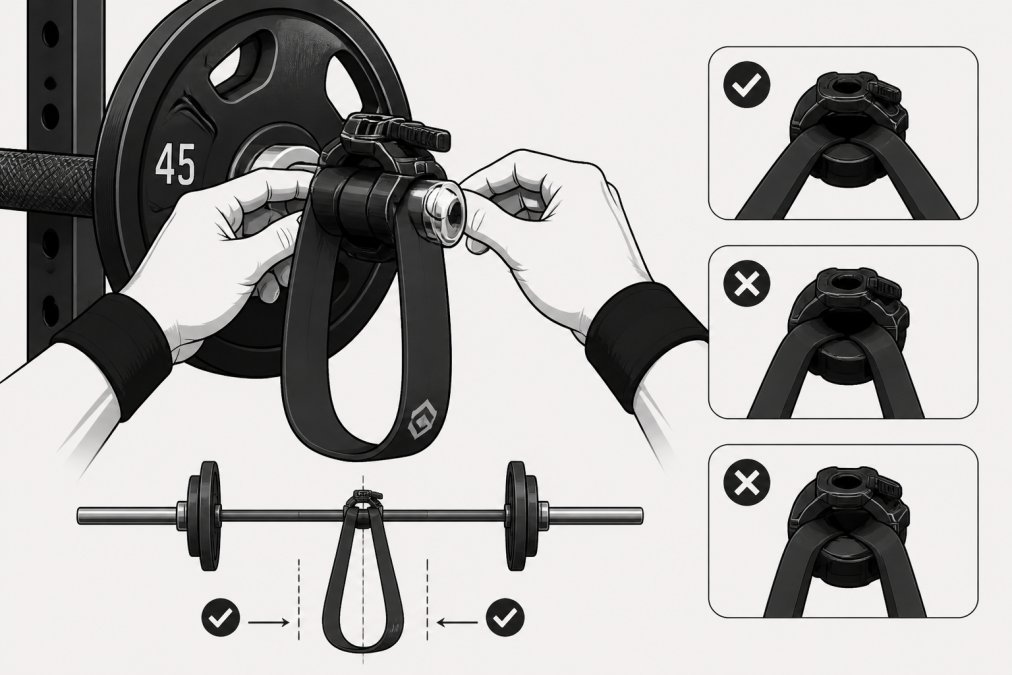
Before loading weight, perform a few unloaded reps. The band should remain stationary relative to the barbell. If it shifts or rotates, tighten the collar further. Stand on the band with both feet to anchor it to the ground, positioned directly under the barbell with feet shoulder-width apart. The band should be taut but not stretched before you begin the movement. This dual-anchor system ensures consistent tension throughout your set.
Anchoring Bands to Racks and Landmine Setups
For landmine setups, loop one end of the band around the landmine sleeve or base. Secure it tightly so the band cannot rotate. The other end loops around your barbell collar using the same method described above.
Rack anchoring requires a secure attachment point. Never rely on friction alone; use a hook, carabiner, or dedicated band peg if your rack provides one. Ensure the band is positioned symmetrically so tension pulls evenly on both sides of the barbell.
Using Bands with Dumbbells and Cable Machines
Dumbbell exercises can incorporate bands by looping a band around the dumbbell handle and standing on the other end. This works particularly well for pressing movements where you want escalating resistance.
For cable machines, some lifters attach bands to the cable attachment point to increase resistance at lockout. Most cable machines have smooth surfaces that don't grip bands well, so this method works better with carabiners or dedicated attachment hardware.
Resistance Band Workouts for Beginners
Starting with bands requires restraint. Beginners benefit from learning proper form with lighter bands and gradually increasing tension as their body adapts.
Starting with Light Tension and Proper Form
Your first priority is movement quality. Select a light band that provides noticeable but manageable resistance. Perform 5-8 reps with just the band and barbell, no additional weight plates. Focus entirely on moving through a full range of motion with control.
Once you've mastered the movement pattern with light bands, add minimal weight to the barbell. Start with just the bar plus 45 pounds per side. Progress gradually by adding 5-10 pounds per side each week rather than jumping to heavy weight. This conservative approach allows your connective tissue to adapt to the new stimulus.
Beginner-Friendly Compound Movements
Three movements form the foundation of beginner band training: the squat, bench press, and deadlift.
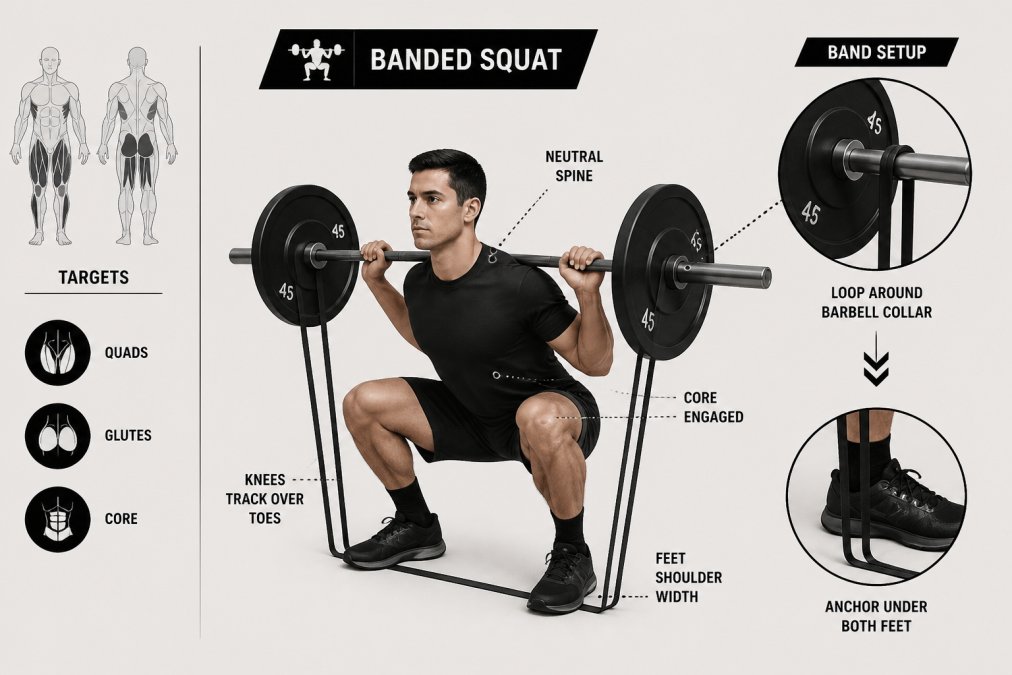
Banded Squat: Stand with feet shoulder-width apart, band looped around the barbell collar and anchored under your feet. Descend by breaking at the hips and knees simultaneously while maintaining an upright torso. Drive through your heels to stand, feeling the band tension increase as you extend. Perform 3 sets of 8-10 reps.
Banded Bench Press: Lie on a flat bench with the band looped around the barbell and anchored under the bench. Press the bar upward, controlling the descent. The band provides escalating resistance as you press, making lockout the most challenging part. Perform 3 sets of 8-10 reps.
Banded Deadlift: Stand with feet hip-width apart, band looped around the barbell and anchored under your feet. Maintain a neutral spine as you hinge at the hips. Drive through your heels to stand. The band increases tension as you extend, creating maximum challenge at lockout. Perform 3 sets of 6-8 reps.
Progressive Overload Techniques with Weighted Bands
Progressive overload, gradually increasing training stimulus, drives strength and muscle gains. Bands offer multiple overload methods beyond simply adding more weight.
Band Stacking and Increasing Tension
The simplest overload method is adding more bands. Start with one medium band. The following week, add a second band of equal thickness. This increases total resistance throughout your range of motion. Band stacking creates customizable resistance profiles, a single heavy band provides linear resistance increase, while two medium bands provide more graduated tension.
Most lifters find that stacking 2-3 bands works well for heavy compound movements. Track your band combinations by noting which bands you used for each exercise and each week. If you've been using the same band combination for four weeks without increasing weight or reps, you've stopped progressing.
Manipulating Range of Motion and Tempo
Progressive overload extends beyond adding resistance. Increasing time under tension builds muscle endurance and hypertrophy. A typical rep takes 2-3 seconds; slowing that to 4-5 seconds makes your muscles work significantly harder.
Range of motion modifications increase difficulty without changing band resistance. Perform squats to a deeper depth or press dumbbells to a greater range. Isometric holds, pausing at specific points in the range of motion, create peak tension that bands excel at producing. Hold at the top of a press for 2-3 seconds when band tension is maximum.
Safety, Anchoring, and Common Mistakes
Bands can snap. Equipment can fail. Improper setup causes injury. Understanding safety principles prevents accidents that derail your training.
Proper Anchor Point Setup and Load Distribution
Every anchor point must be tested before using it under load. Barbell collars must be tight enough that bands cannot slip. Tighten the collar firmly, then test it with light weight. If the band moves at all, tighten further.
Rack anchoring requires dedicated hardware. Never rely on friction alone. Use carabiners, band pegs, or hooks designed for this purpose. Load distribution affects stability, symmetric band placement ensures even tension on both sides of the barbell.
Avoiding Snap Hazards and Equipment Damage
Bands deteriorate over time. Inspect your bands regularly for cracks, tears, or thin spots. A band that shows visible damage should be retired immediately. Avoid sharp edges that can puncture bands. Never overstretch bands beyond their design limits.
Store bands properly by keeping them away from direct sunlight and extreme heat. Store them loosely coiled rather than tightly wound. Replace bands when they show significant wear. A band that's lost elasticity won't provide consistent resistance.
Adding weighted bands to workouts represents one of the most underutilized training tools available. The variable resistance they provide creates a training stimulus that static weights cannot match, particularly in the strongest part of your range of motion. Beginners who master band integration early develop stronger movement patterns and greater overall strength. Experienced lifters use bands to break through plateaus and build specific strength in lockout positions.
Health and Fitness Company's precision-engineered weighted bands are designed specifically for this integration. Our adjustable bands allow you to customize resistance profiles for your exact goals, whether you're building foundational strength or pushing toward advanced strength standards. Quality equipment prevents the snap hazards and inconsistent tension that plague cheaper alternatives. Start with light bands, master your movement patterns, and progress systematically through progressive overload. The results compound over months and years of consistent training.
Frequently Asked Questions
How do I know if I'm attaching resistance bands to my equipment correctly?
Secure bands using safety sleeves or collars to prevent slipping, and verify the anchor point is rated for the combined load. The band should sit flush against the equipment with no twists. Test the setup with light weight first, the band should remain stationary throughout the full range of motion. If it shifts or slides, reposition it or use additional anchoring methods like loop attachments or dedicated band pegs.
What are the benefits of adding bands to barbell exercises?
Banded barbell work creates variable resistance, increasing tension in the peak contraction phase where you're strongest. This drives greater muscle recruitment and hypertrophy. Bands also reduce joint stress during the eccentric phase, improve stabilizer muscle activation, and allow progressive overload without adding weight to the bar. The accommodating resistance matches your strength curve, making exercises more effective for compound movements like squats and deadlifts.
Can beginners use weighted bands safely, or should I wait until I'm stronger?
Beginners can use resistance bands immediately if they start with light tension and focus on form. Bands actually help beginners by providing consistent tension throughout the range of motion, which builds stabilizer muscles and improves joint stability. Start with single-band setups on bodyweight exercises like squats or push-ups, then progress to barbell combinations as you adapt. Prioritize proper anchor point setup and controlled movement over heavy load.
How long do quality weighted bands last before they need replacement?
High-quality bands typically last 1-2 years with regular use, depending on training frequency and maintenance. Inspect bands monthly for tears, discoloration, or loss of elasticity. Store them away from direct sunlight and extreme temperatures, and avoid contact with sharp equipment edges. Bands with proper care and correct anchor points maintain their resistance profile much longer than cheaper alternatives that degrade quickly or snap unexpectedly during heavy loads.
This article was written using GrandRanker