How to Improve Cycling Comfort With Alloy Bars

Table of Contents
- Why Alloy Handlebars Matter for Cycling Comfort
- Carbon vs. Alloy: Understanding Vibration Damping Differences
- Best Handlebar Tape for Vibration Damping
- How to Adjust Road Bike Handlebar Angle for Comfort
- Tire Pressure and Ride Comfort: The Connection
- DIY Vibration Dampening Hacks for Alloy Bars
- Alloy-Specific Maintenance for Long-Term Durability
- Conclusion
Last Updated: August 11, 2026
Why Alloy Handlebars Matter for Cycling Comfort
Alloy handlebars are often overlooked in cycling comfort, yet they play a critical role in how your bike feels during long rides. Unlike carbon fiber alternatives, aluminum alloy bars offer different compliance characteristics that, when properly optimized, deliver surprising comfort gains. A well-tuned alloy bar with proper tape, correct tire pressure, and thoughtful geometry adjustments often outperforms a basic carbon setup at a fraction of the cost.
Carbon vs. Alloy: Understanding Vibration Damping Differences
The vibration damping difference between carbon and alloy handlebars comes down to material compliance and energy dissipation. Carbon fiber absorbs high-frequency vibrations through its composite structure, while aluminum alloy transmits vibrations more directly but with characteristics you can control through setup.
Aluminum alloy's structural integrity means it won't flex unpredictably, giving you consistent feedback. The fatigue life of alloy bars is exceptional when properly maintained, they won't develop micro-fractures like some carbon bars can under repeated stress. For riders logging 40-60 miles weekly, this durability advantage often outweighs the vibration-damping edge carbon provides.
The real advantage of alloy emerges when you layer in complementary upgrades: proper bar tape, correct tire pressure, and geometry adjustments. These modifications amplify alloy's natural characteristics and often match or exceed what basic carbon bars deliver without the premium cost.
Best Handlebar Tape for Vibration Damping
The best handlebar tape for vibration damping is thicker, cushioned tape with a tacky surface that won't slip under your hands. Look for tape with a minimum thickness of 2-3mm and a cork or foam backing, which provides better impact absorption than thin synthetic options. This single component has an outsized effect on cycling comfort.
Quality tape maintains its structure through hundreds of miles, preserving the dampening effect that protects your hands and forearms from road buzz. Cork-backed tape offers superior vibration absorption compared to foam alone, cork's cellular structure naturally dampens high-frequency vibrations while remaining responsive to your inputs.
Installation technique affects performance as much as tape choice. Proper wrapping tension and overlap patterns determine whether your tape stays in place and continues dampening vibrations throughout the season. Loose tape bunches and loses contact with the bar; overly tight tape restricts hand position and reduces padding benefit.
How to Adjust Road Bike Handlebar Angle for Comfort
Adjusting your road bike handlebar angle for comfort is one of the highest-impact modifications you can make, often producing noticeable improvements within a single ride. Small adjustments, even 5-10 degrees, can transform how your bike feels.
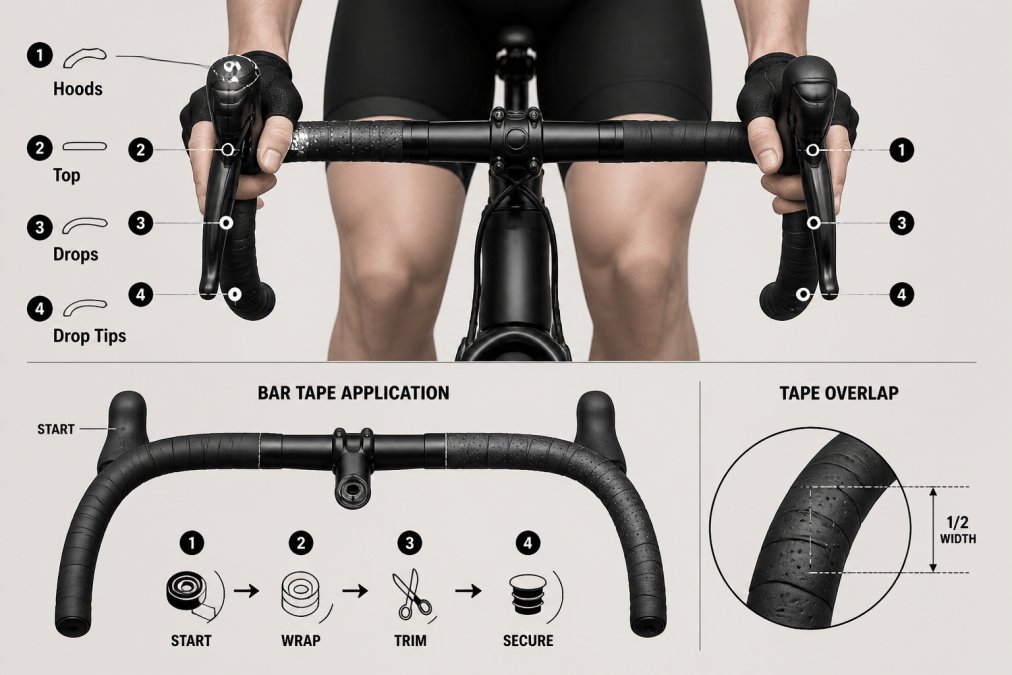
Start by identifying your current bar angle. Most road bikes ship with bars angled slightly downward from the stem, typically 10-20 degrees below horizontal. A bar angled too steeply downward forces your wrists into extension, causing hand numbness and fatigue. An angle too upright may feel unstable on descents.
Begin adjustments in small increments. Loosen your stem bolts slightly, rotate the bar 5-10 degrees, and take a test ride of 20-30 minutes on familiar terrain. Pay attention to hand pressure, wrist position, and any numbness developing in your palms or fingers before making additional changes.
Stem Angle and Spacer Stack Adjustments
Your stem angle and spacer stack work together to establish your overall reach and drop geometry. Most riders benefit from a slightly higher bar position than their bike shipped with. Raising your bar by 10-20mm reduces wrist extension and hand pressure, which decreases fatigue significantly.
To adjust spacer stack, remove your stem and shift spacers from above to below it. Each spacer moved down raises your bar by approximately that spacer's thickness. Make changes gradually, test for 50+ miles, then reassess.
Stem angle affects your hand position along the bar's length. A more upright stem positions your hands further back on the bar, which some riders find more comfortable for longer rides. A more aggressive stem angle moves your hands forward, increasing aerodynamic position but potentially increasing hand pressure.
Finding Your Ideal Reach and Drop Geometry
Reach and drop geometry describes the horizontal distance (reach) and vertical distance (drop) from the brake lever hoods to the bar ends. This geometry fundamentally shapes your cockpit ergonomics. Reach affects how far forward you reach to access the drops; too much reach strains your lower back, too little bunches your upper body. Drop determines the vertical distance between hoods and bar ends, affecting how much your posture changes between positions.
The hood position, where your hands rest on the brake levers, becomes your primary hand position on longer rides. This position should feel stable and require minimal grip pressure. Testing geometry requires borrowing demo bars or purchasing options to compare. Spend at least 100 miles on each geometry before deciding; your hands need time to adapt and provide honest feedback.
Tire Pressure and Ride Comfort: The Connection
Tire pressure is one of the most underestimated factors affecting ride comfort and vibration damping. Lower tire pressure increases the tire's compliance, allowing it to absorb small road imperfections before that vibration reaches your hands and arms. Most riders run tire pressure 5-10 PSI higher than optimal, which reduces rolling resistance slightly but dramatically increases road harshness.
The ideal pressure depends on your body weight, tire width, and riding conditions. Heavier riders need higher pressure to prevent pinch flats; lighter riders can run lower pressure safely. Wider tires (28mm or larger) allow lower pressure without increased flat risk.
Start by reducing your current pressure by 5 PSI and riding for 50 miles on mixed terrain. Monitor for pinch flats and assess comfort improvements. If no flats occur and comfort improves, reduce another 5 PSI and repeat. Most riders find their sweet spot between 75-90 PSI, adjusted for their specific conditions.
DIY Vibration Dampening Hacks for Alloy Bars
DIY vibration dampening hacks for alloy bars let you improve comfort without expensive component upgrades. These techniques amplify your bar's natural characteristics and work especially well when combined with proper tire pressure and geometry adjustments.
Double-Wrap and Padding Techniques
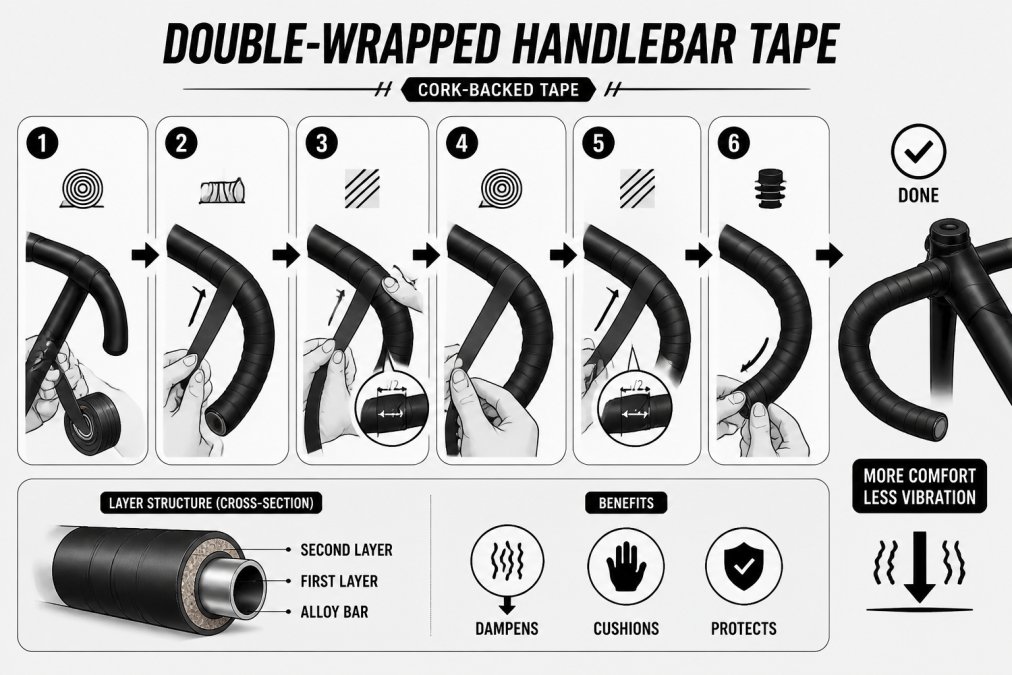
Double-wrapping your handlebars involves applying a base layer of thicker padding before your final bar tape layer. Use a 3-4mm closed-cell foam or cork backing as your base layer, then wrap your standard bar tape over it. Wrap the base layer with slight tension, overlapping by about 50% as you progress along the bar.
Your final bar tape layer goes over the base layer using standard wrapping technique. The combination of two layers provides roughly double the vibration damping of single-layer wrapping, significantly reducing road buzz transmission to your hands. This approach costs minimal money, typically $15-30 for materials, and takes 45 minutes to implement.
Handlebar Flare and Width Optimization
Handlebar width measured at the hoods should match your shoulder width, typically within 5-10mm. A bar that's too narrow forces your hands inward, creating shoulder tension and reducing stability. A bar that's too wide spreads your shoulders excessively, increasing frontal profile and reducing power transfer efficiency.
Width also affects vibration damping indirectly. A properly-sized bar that matches your shoulder width allows relaxed hand positioning, which reduces grip pressure and hand fatigue. Testing different widths requires trying multiple bars or borrowing from other riders. Most people discover their ideal width falls within a narrow range, often just 1-2cm of their shoulder width.
Alloy-Specific Maintenance for Long-Term Durability
Alloy handlebars require specific maintenance practices to preserve their structural integrity and performance characteristics. Inspect your bars monthly for corrosion, cracks, or bending. Aluminum oxidizes naturally, creating a white powdery surface that's cosmetic but worth cleaning with a soft brush and mild soap.
Cracks in alloy bars are serious and non-repairable. Even small cracks propagate under load and will eventually fail completely. If you spot a crack, replace the bar immediately. Use a torque wrench set to manufacturer specifications (typically 5-8 Nm for stem bolts) and check torque every 500 miles initially, then every 1000 miles once you've confirmed stability.
Keep your bar tape clean and dry. Moisture trapped under tape accelerates corrosion. Replace tape annually or whenever it shows compression or deterioration. Store your bike indoors when possible; outdoor storage exposes alloy bars to constant moisture and temperature cycling, accelerating oxidation.
Conclusion
How to improve cycling comfort with alloy bars comes down to understanding your specific setup and making targeted adjustments rather than assuming you need expensive upgrades. Proper bar tape, correct tire pressure, thoughtful geometry adjustments, and maintenance practices combine to create a comfortable, durable alloy bar setup that rivals carbon alternatives at a fraction of the cost.
Health and Fitness Company's precision-engineered alloy handlebars are designed with these principles built in, offering the durability and performance characteristics that support long-term comfort improvements. With the right approach to configuration and maintenance, you'll find that alloy bars deliver reliable, consistent comfort mile after mile.
Frequently Asked Questions
Do alloy handlebars cause more hand numbness than carbon?
Alloy bars transmit more road vibration and impact than carbon fiber, which can increase hand fatigue and numbness on longer rides. However, proper bar tape, correct tire pressure, and stem angle adjustment can significantly reduce this effect. Many riders successfully use alloy bars for 40+ mile rides by combining these comfort strategies rather than upgrading to carbon.
What is the best handlebar tape thickness for vibration damping?
Thicker tape (3-4mm) provides better vibration absorption than standard tape (2-3mm). Double-wrapping or using gel-padded tape offers additional cushioning. The ideal thickness balances damping with handlebar diameter, too thick reduces lever reach and can feel sluggish. Test 3-4mm tape first; if hand numbness persists, add a second layer rather than replacing with thicker tape.
How much does lowering tire pressure improve handlebar comfort?
Reducing tire pressure by 5-10 psi from your baseline can noticeably reduce road buzz and impact transmitted to your hands. Lower pressure increases tire compliance and absorbs road harshness. Start with a 5 psi reduction and monitor handling; go too low and you risk pinch flats and sluggish steering. Tire pressure interacts with bar setup, so adjust this alongside tape and stem angle changes.
Can adjusting handlebar angle really reduce wrist pain?
Yes. Handlebar angle directly affects hand positioning, pressure distribution, and wrist angle. Raising the bar (via spacers or a more upright stem) reduces reach and hand fatigue. Lowering it increases aerodynamic drag but may worsen fatigue. Most riders find comfort by adjusting stem angle first, even 5-10 degrees change hand pressure significantly. Pair angle changes with bar tape and tire pressure for best results.
This article was written using GrandRanker