How to Wrap Alloy Road Bike Handlebars Properly

Table of Contents
- Tools Needed for Bike Maintenance and a Clean Handlebar Wrap
- How to Remove Old Handlebar Tape Without Damaging Alloy Bars
- Cleaning and Prepping Alloy Handlebars Before You Wrap
- Handlebar Tape Wrapping Techniques: Direction, Overlap, and Tension
- Wrapping Around Brake Hoods and Managing Shifter Cables
- Finishing the Wrap: Bar End Plugs, Finish Tape, and a Clean Look
- Troubleshooting Lumpy Hoods, Tape Materials, and Long-Term Care
- Frequently Asked Questions
Last Updated: October 1, 2026
Tools Needed for Bike Maintenance and a Clean Handlebar Wrap
Learning to wrap handlebars well starts with the right tools laid out before you touch the bike. This guide from Health and Fitness Company covers how to properly wrap alloy road bike handlebars so the tape stays tight, the hoods stay smooth, and the finish looks factory-clean. Most botched wraps trace back to missing tools, not bad technique.
Here's what you need on the bench:
- New handlebar tape with adhesive backing
- Scissors or a sharp blade for a diagonal cut
- Electrical tape for a temporary hold
- Finish tape (usually included with the roll)
- Bar end plugs
- Allen keys for brake and shifter bolts
- Clean rags and isopropyl alcohol
- A repair stand, if you have one
How to Remove Old Handlebar Tape Without Damaging Alloy Bars
Peel old tape from the bar ends inward, not the other way around. Cutting toward the center lets you unwrap the overlap cleanly instead of fighting it. Use your fingers first, then a plastic tire lever for stubborn adhesive, a metal scraper gouges alloy fast.

- Lift the finish tape at the bar end with your fingernail
- Unwind the tape back toward the stem
- Pull the bar end plug out with a small screwdriver
- Loosen the brake and shifter bolts to free the levers if tape runs under them
- Wipe away leftover adhesive with a rag and a little alcohol
Cleaning and Prepping Alloy Handlebars Before You Wrap
A clean bar is the difference between tape that grips and tape that slides. Scrub the full length with isopropyl alcohol and a lint-free rag, then let it dry completely. While it's bare, check for deep scratches, dents, or cracks near the stem clamp, and replace any bar with visible damage rather than wrapping over it.
- Remove all grease, sweat residue, and old adhesive
- Dry the bar fully before applying new tape
- Inspect the clamp area for stress marks
- Confirm brake levers sit where you want them before wrapping
Handlebar Tape Wrapping Techniques: Direction, Overlap, and Tension
When you wrap handlebars, start at the bar end and wrap toward the stem. That direction keeps the tape edges facing down as you grip, so your hands press the overlaps tighter instead of peeling them up.
- One-third overlap for a smooth, even surface
- Firm, steady pull on every wrap
- Keep the tape edge straight as you go
- Pause at the hoods to plan the transition
Wrapping Around Brake Hoods and Managing Shifter Cables
The brake hood transition is where most wraps go wrong, and it is the one section worth slowing down for. You are no longer wrapping a cylinder but a shape that changes diameter and angle, with a lever body bolted to it. Get it wrong and you get the classic lump under your palm for the life of the tape.
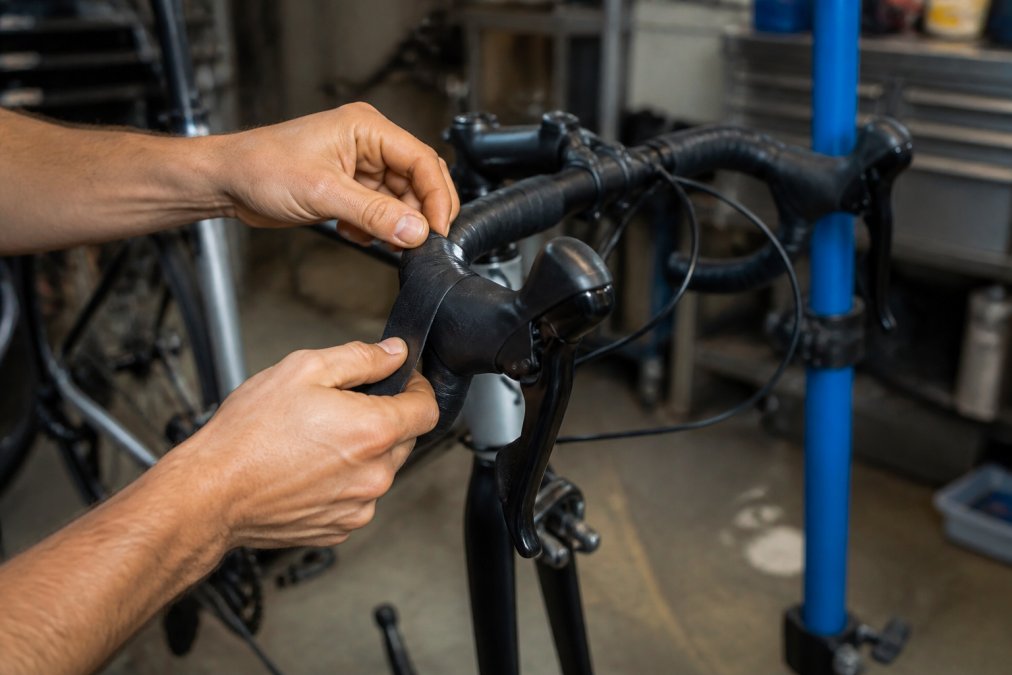
The figure-eight, explained as a mechanism
A figure-eight is not decorative, it is how you reverse the tape's travel direction around the hood clamp without leaving a gap. The sequence:
- Wrap up to the point where the bar meets the back of the hood clamp.
- Pass the tape under the hood body, running it along the inside of the clamp.
- Bring the tape up and over the top of the bar on the far side of the hood.
- Cross back over the front of the hood, then continue wrapping up the bar.
Tension at the hood is different from tension on the straight bar
On the straight sections, pull firm and even. At the hood, ease off slightly on the pass under the clamp, then pull firm again once back on the bar. Pulling hard through the figure-eight stretches the tape thin right where it needs to stay thick, and that thin spot compresses into a lump later.
Material changes the technique
Stretch limits vary by tape material, and the hood is where that matters most:
- Cork tape stretches easily and forgives a sloppy figure-eight. It is the most beginner-friendly option at the hood.
- Gel-backed tape has a firm backing that resists stretching. Pull it too hard at the hood and the gel layer separates from the backing. Keep tension moderate.
- Synthetic tape stretches less than cork but holds its shape well. It is more forgiving than gel at the transition.
- Leather tape has almost no stretch. You cannot pull it tight around the hood clamp, so you need to plan the figure-eight so the tape lies flat by geometry rather than by tension.
Hiding the transition so it disappears under your palm
The goal is not to make the figure-eight invisible from three feet away but invisible to your hand. Two things achieve that:
- Keep the overlap at the hood slightly tighter than one-third to reduce bulk.
- Press the tape down with your thumb as you cross, seating the adhesive before moving on, unpressed tape lifts and bunches.
Managing shifter cables and housing
On most modern road setups, the shifter housing runs under the tape from the hood to the bar. The rule: the housing stays flat against the bar, and the tape goes over it without twisting it.
- Loosen the hood clamp bolt slightly before you start the transition. This gives the tape room to pass under the hood body.
- Route the tape so it covers the housing rather than pinching it against the bar.
- Keep the housing untwisted. A twisted housing creates a bump you will feel through the tape.
- Tighten the hood clamp once the tape clears the transition, then check that the lever still moves freely.
Finishing the Wrap: Bar End Plugs, Finish Tape, and a Clean Look
Cut the tape end with a diagonal cut so it lies flat against the bar. A straight cut leaves a corner that lifts. The diagonal edge tucks under the finish tape and disappears.
- Diagonal cut the tape end for a flat lay
- Wrap finish tape with light tension
- Seat bar end plugs fully
- Trim any loose adhesive strands
Troubleshooting Lumpy Hoods, Tape Materials, and Long-Term Care
Most wrap guides stop when the tape is on, but that is where the real problems start: the lump you feel at mile twenty, the tape that goes slick after a wet season, the corrosion hiding under a wrap you never removed. This section covers diagnosing a bad hood, choosing tape by behavior rather than looks, and keeping the bar underneath alive.
Diagnosing a lumpy hood
A lump at the hood is almost never the tape's fault. It is one of three things:
- Uneven tension through the figure-eight. The tape stretched thin on one pass and bunched on the next. Fix: unwrap past the transition and redo it with a steadier, slower pull.
- Too much overlap at the transition. More than one-third overlap stacks tape on itself. Fix: narrow the overlap to about a quarter-width through the figure-eight only.
- Housing sitting proud of the bar. If the shifter housing is not pressed flat, the tape rides over a ridge. Fix: reseat the housing against the bar before wrapping.
Choosing tape by behavior, not by look
This table is about how each material behaves during and after the wrap, not how it photographs:
| Tape Type | Stretch Behavior | Padding Life | Best For | Watch Out For |
|---|---|---|---|---|
| Cork | High, forgives tension errors | Short, compresses in a season | Beginners, comfort rides | Wears slick fast |
| Gel-backed | Low, resists stretching | Medium, compresses over time | Long distances, numb hands | Gel layer can separate if over-pulled |
| Synthetic | Medium, holds shape | Long | Wet weather, durability | Firmer feel, less cushion |
| Leather | Very low, almost none | Very long with care | Show bikes, classic builds | Needs conditioning, no stretch forgiveness |
Ergonomic customization: double wrapping and targeted padding
This is the angle most guides miss. If your hands go numb, tingle, or ache on rides over an hour, the fix is not a new bar, it is targeted padding.
- Double wrapping the whole bar adds roughly 2-3 mm of diameter and meaningful vibration damping, but changes your reach and drop, so expect to adjust lever position afterward.
- Targeted padding at the hoods, a short second layer of gel tape only around the transition, adds cushion exactly where the ulnar nerve sits without changing the feel of the drops.
- Targeted padding on the tops helps riders who spend most of their time climbing with hands on the flat section.
Preventing sweat corrosion under the tape
Alloy bars corrode under handlebar tape, and you will not see it until you unwrap. Salty sweat wicks under the tape edges and sits against the bar for months, pitting it at exactly the point where your weight loads it.
- Wipe the tape with a damp rag after wet or dusty rides. This removes surface sweat before it wicks under the edges.
- Check the finish tape and bar end plugs every few weeks. Loose finish tape is an open door for sweat.
- Unwrap and inspect the bars once a year, even if the tape still looks fine. Look for white or gray powdery residue, that is aluminum oxide, and it means corrosion is already underway.
- If you find pitting deeper than a light surface mark, replace the bar. Do not wrap over it.
When to replace the tape
Replace tape when it feels slick, tears at the edges, or peels up at the hoods. Most riders swap once or twice a season; humid climates or heavy sweaters may need more. A tape change is also the cheapest chance to inspect the bars for corrosion, so treat it as maintenance, not cosmetics.
Frequently Asked Questions
Which way should you wrap road bike handlebar tape?
Start at the bar end and wrap toward the stem, moving in the direction your hands rotate when gripping. On the right side this means clockwise from the bar end; on the left, counter-clockwise. Wrapping this way tightens the tape as you ride instead of peeling the edges up. It also keeps the overlap edges facing away from your palms, which reduces friction and keeps the wrap from rolling loose during hard efforts.
How much overlap should you use when wrapping bar tape?
Aim for about one-third overlap on each pass, which means each new wrap covers roughly a third of the previous layer. This gives you consistent cushioning without a bulky feel. If you overlap too little, gaps open up and expose the alloy bar. If you overlap too much, the tape builds up and gets lumpy around the brake hoods. Keep tension even the whole way so the overlap stays uniform.
Can you wrap bike handlebars yourself without professional tools?
Yes. You need handlebar tape, bar end plugs, finish tape, scissors, and a clean rag with degreaser. No shop tools are required. The main skill is keeping consistent tension and handling the brake hood transition cleanly. Set aside 30 to 45 minutes for your first attempt. If a section looks lumpy, unwrap back to the bar end and redo it. Tape is forgiving, and a second pass usually looks better than the first.
How often should you replace road bike handlebar tape?
Replace it every 6 to 12 months, or sooner if you ride 40 or more miles a week. Signs it is due include worn spots at the hoods, fraying edges, compressed padding that no longer dampens vibration, and tape that has shifted and exposed the alloy bar underneath. Fresh tape restores grip and comfort, and it protects the bar surface from sweat and grime. Pair the job with a bar and stem check while the tape is off.
Wrapping handlebars properly takes one clean pass and a steady hand, and the payoff is a bar that feels solid under load for months. If you're due for a bar upgrade before your next wrap, Health and Fitness Company builds alloy handlebars with an ergonomic shape, rubber lock-on grips, and a light, durable build that installs in minutes. Get started with Health and Fitness Company and ride with a bar and wrap that hold up mile after mile.